Tracking Guide
EasyPost provides two primary methods for tracking packages:
- Supplying an existing carrier tracking number to create a
Trackerobject. - Purchasing a shipping label through EasyPost, which automatically generates a Tracker.
Tracking updates are delivered through Event webhooks. Refer to the Webhooks Guide for implementation details on receiving Event objects.
- Sign up or log in to an existing EasyPost account.
- Configured webhook URLs for Test and Production mode.
- One of the official EasyPost client libraries installed.
- Familiarity with the Getting Started Guide (recommended).
To track a shipment not created through EasyPost, create a Tracker with a tracking_code and, optionally, a carrier.
If carrier is omitted, EasyPost attempts auto-detection. If the tracking code cannot be matched to a supported carrier, an error is returned.
1curl -X POST https://api.easypost.com/v2/trackers \
2  -u "EASYPOST_API_KEY": \
3  -H 'Content-Type: application/json' \
4  -d '{
5    "tracker": {
6      "tracking_code": "EZ1000000001",
7      "carrier": "USPS"
8    }
9  }'
After a Tracker is created, EasyPost periodically checks for new carrier updates and posts them via tracker.updated webhook Events.
Tracking is automatically enabled for all shipping labels purchased through EasyPost. No additional API calls are required.
When a label is purchased:
- A
Trackeris automatically generated. - The response includes the
tracking_code. - Tracking updates are delivered through webhook
Events.
For full shipment creation steps, see the Getting Started Guide.
1curl -X POST https://api.easypost.com/v2/shipments/shp_.../buy \
2  -u "EASYPOST_API_KEY": \
3  -H 'Content-Type: application/json' \
4  -d '{
5    "rate": {
6      "id": "rate_..."
7    },
8    "insurance": "249.99"
9 }'Once a Tracker is created–either manually or during label purchase–EasyPost begins sending tracking updates as webhook Events.
- Sends a single tracking event in a supported status.
- No additional events follow.
- Sends an initial event with status unknown.
- Additional events follow as the carrier scans the shipment.
Tracking updates always use:
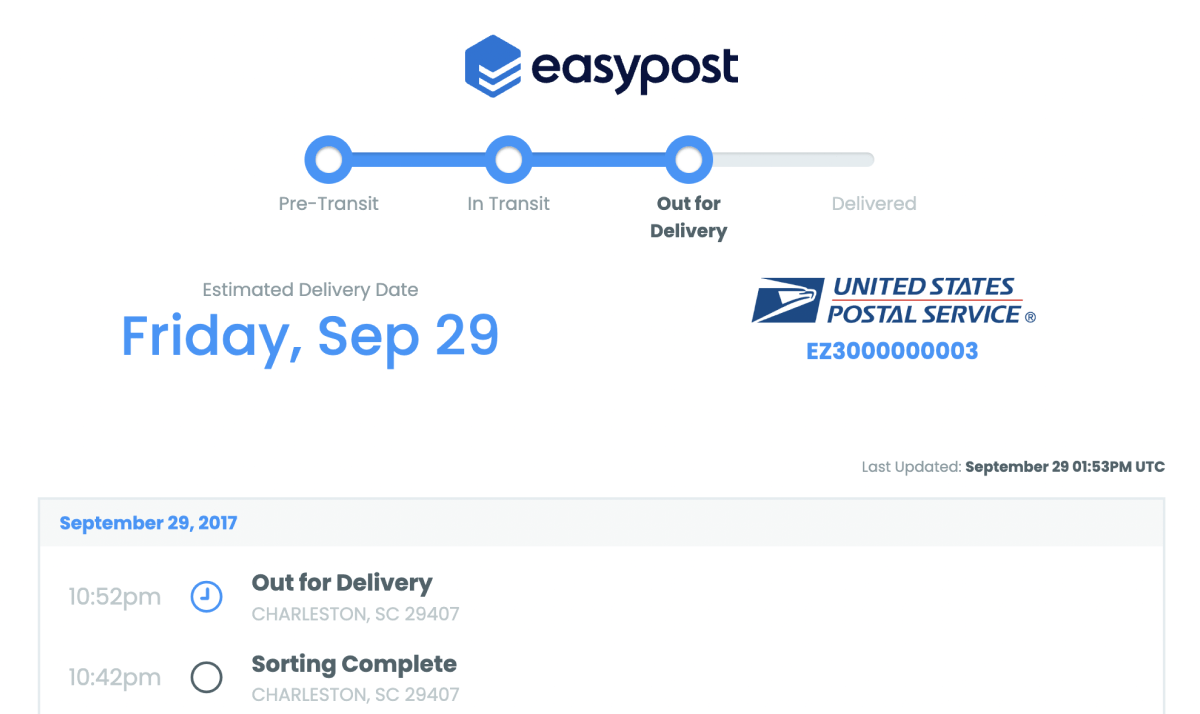
object: “Event”description: “tracker.updated”result:A nestedTrackerobject containing the lateststatusand details.
The top-level status field on the Tracker object is the most reliable indicator for business logic.
{
  "id": "evt_...",
  "object": "Event",
  "created_at": "2014-11-19T10:51:54Z",
  "updated_at": "2014-11-19T10:51:54Z",
  "description": "tracker.updated",
  "mode": "test",
  "previous_attributes": {
    "status": "unknown"
  },
  "pending_urls": [],
  "completed_urls": [],
  "result": {
    "id": "trk_...",
    "object": "Tracker",
    "mode": "test",
    "tracking_code": "EZ4000000004",
    "status": "delivered",
    "created_at": "2014-11-18T10:51:54Z",
    "updated_at": "2014-11-19T10:51:54Z",
    "signed_by": "John Tester",
    "weight": 17.6,
    "est_delivery_date": "2014-11-27T00:00:00Z",
    "shipment_id": null,
    "carrier": "UPS",
    "public_url": "https://track.easypost.com/djE7...",
    "tracking_details": [
      {
        "object": "TrackingDetail",
        "message": "BILLING INFORMATION RECEIVED",
        "status": "pre_transit",
        "datetime": "2014-11-21T14:24:00Z",
        "tracking_location": {
          "object": "TrackingLocation",
          "city": null,
          "state": null,
          "country": null,
          "zip": null
        }
      },
      {
        "object": "TrackingDetail",
        "message": "ORIGIN SCAN",
        "status": "in_transit",
        "datetime": "2014-11-21T14:48:00Z",
        "tracking_location": {
          "object": "TrackingLocation",
          "city": "SOUTH SAN FRANCISCO",
          "state": "CA",
          "country": "US",
          "zip": null
        }
      },
      {
        "object": "TrackingDetail",
        "message": "DEPARTURE SCAN",
        "status": "in_transit",
        "datetime": "2014-11-22T08:51:00Z",
        "tracking_location": {
          "object": "TrackingLocation",
          "city": "SOUTH SAN FRANCISCO",
          "state": "CA",
          "country": "US",
          "zip": null
        }
      },
      {
        "object": "TrackingDetail",
        "message": "ARRIVAL SCAN",
        "status": "in_transit",
        "datetime": "2014-11-23T09:31:00Z",
        "tracking_location": {
          "object": "TrackingLocation",
          "city": "SAN FRANCISCO",
          "state": "CA",
          "country": "US",
          "zip": null
        }
      },
      {
        "object": "TrackingDetail",
        "message": "OUT FOR DELIVERY",
        "status": "out_for_delivery",
        "datetime": "2014-11-24T08:10:00Z",
        "tracking_location": {
          "object": "TrackingLocation",
          "city": "SAN FRANCISCO",
          "state": "CA",
          "country": "US",
          "zip": null
        }
      },
      {
        "object": "TrackingDetail",
        "message": "DELIVERED",
        "status": "delivered",
        "datetime": "2014-11-19T10:51:54Z",
        "tracking_location": {
          "object": "TrackingLocation",
          "city": "SAN FRANCISCO",
          "state": "CA",
          "country": "US",
          "zip": null
        }
      }
    ]
  }
}
The tracking_details array contains all current and historical status information returned by the carrier. Each TrackingDetail includes:
- Carrier message (e.g.,
“OUT FOR DELIVERY”) - Status
- Timestamp
tracking_locationfield with location data when supplied.
Oldest events appear first, and new events are appended as they are received. Because carriers occasionally send updates out of order, use the top-level status field for any primary workflow logic.
Carriers do not consistently supply time zone information. Some return timestamps in local time without a zone, while others include full time-zoned timestamps. Historically, timestamps without time zones were interpreted as UTC, which could misrepresent the actual event time.
To improve accuracy, EasyPost now attempts to determine the correct time zone for a tracking event using available carrier location data.
When a tracking_location contains usable details–such as city, state, zip, or country—EasyPost:
- Maps the location to a real-world geographic point.
- Determines the likely time zone.
- Stores and presents the timestamp with the correct time zone whenever possible.
If sufficient information is provided, the timestamp may still use UTC or a best-effort estimate.
- Time zone precision depends on the level of detail provided by the carrier.
- Not all carriers provide adequate location data.
- Events with explicit time zones from the carrier are preserved as provided.
Applications should treat timestamps as best-effort values rather than guaranteed time-zone-accurate across all carriers.
Scenario | Timestamp Format | Reasoning |
|---|---|---|
| Geocoded location available (e.g., Denver, CO) | 2025-01-12T07:03:00-07:00 | A valid city/state/ZIP allows EasyPost to assign the correct local time zone based on the scan location. |
| Insufficient location data (no city/state/ZIP) | 2025-01-12T14:03:00Z | Without enough geographic detail, timestamps default to UTC to ensure consistent and accurate presentation. |
When assigning a time zone to a tracking event, EasyPost evaluates the quality of available carrier location data. Each event is assigned a confidence level that reflects how precisely the location could be determined.
Confidence levels are informational and should be treated as best-effort indicators. They do not guarantee absolute accuracy.
Confidence Level | Description |
|---|---|
| HIGH | Time zone determined using precise city and state information provided by the carrier. |
| MEDIUM | Time zone inferred using postal code–level data where city or state information is unavailable. |
| LOW | Time zone estimated using carrier fallback logic or interpolated location data when precise geographic details are missing. |
| NULL | The carrier did not provide valid location information. When location data is unavailable or cannot be determined for a tracking event, associated location fields are returned as 'null'. |
Tracking events can be used to provide proactive shipment updates and improve the post-purchase experience.
For a fully branded, no-code post-purchase experience–including automated email and SMS notifications–EasyPost offers Advanced Tracking, powered by WeSupply.
Advanced Tracking provides:
- Custom-branded tracking pages
- Automated email and SMS notifications
- Split-shipment visibility
- End-customer insights and reporting
This option is ideal for teams seeking a complete branded experience without managing custom notification logic.
For workflows that require full programmatic control–such as internal alerts, operational notifications, or integrations with existing systems–tracking webhooks can drive custom logic for email, SMS, or other channels.
Common patterns include:
-
Linking recipients to the public tracking page using the
public_url. -
Sending email updates when key events occur, such as
out_for_deliveryanddelivered. -
Sending SMS updates using providers such as Twilio.